🤖 Automating test result reports in Google Sheets with Apps Script
Google Apps Script to automatically generate test result reports
If you work in a lab, you know that managing data and generating reports can be a huge time sink. For our hematology samples, we use a Google Sheet as a sort of LIMS (Laboratory Information Management System) to keep track of everything. But when it came to creating individual patient reports, it was a manual copy-paste marathon – time-consuming and definitely prone to the occasional error. I figured there had to be a better way, so I had to do a little something happen with Apps Script.
The goal was simple: create a tool directly within our Google Sheet that could automatically generate formatted test result reports based on Google Doc templates with just a few clicks. And let me tell you, it’s been a game-changer.
The first step was to create an easy-to-use interface. Using Google Apps Script’s onOpen() trigger, I added a custom menu right into our Google Sheet. When anyone opens the sheet, they see a new menu called “Generare buletine de analiză” (Generate Analysis Reports).
This menu has options for the different types of hematology reports we frequently generate:
- Fusion Genes Report
- FLT3-NPM1 Report
- cKIT Report
- Quantitative BCR-ABL Report
 Our LIMS Sheet & the report generation menu
So, the core idea behind the script is pretty straightforward for each of the 4 report types:
- Identify the correct Google Doc template for that specific report and the Google Drive folder where the new report should be saved.
- Access our main Google Sheet to get all the patient and sample data.
- Prompt the user to enter a unique sample identifier.
- Find the patient’s data in the sheet based on that.
- Interactively ask the user to input the specific test results for that patient (e.g., status of different gene mutations or fusions).
- Make a copy of the Google Doc template.
- Dynamically populate the new document with patient information from the sheet and the results entered by the user, by replacing predefined `` in the template.
- Perform some smart data formatting – like converting sample type codes to full names or extracting blast percentages from observation notes.
- For some reports, like the “Gene Fuziune” the script even dynamically formats tables within the report, removing rows for markers that weren’t tested and highlighting rows where a result is positive.
- Save the newly generated report
- Create a hyperlink to this new report and place it directly into the patient’s row in the LIMS sheet for super easy access later
- Ask if the user wants to generate another report for a different sample.
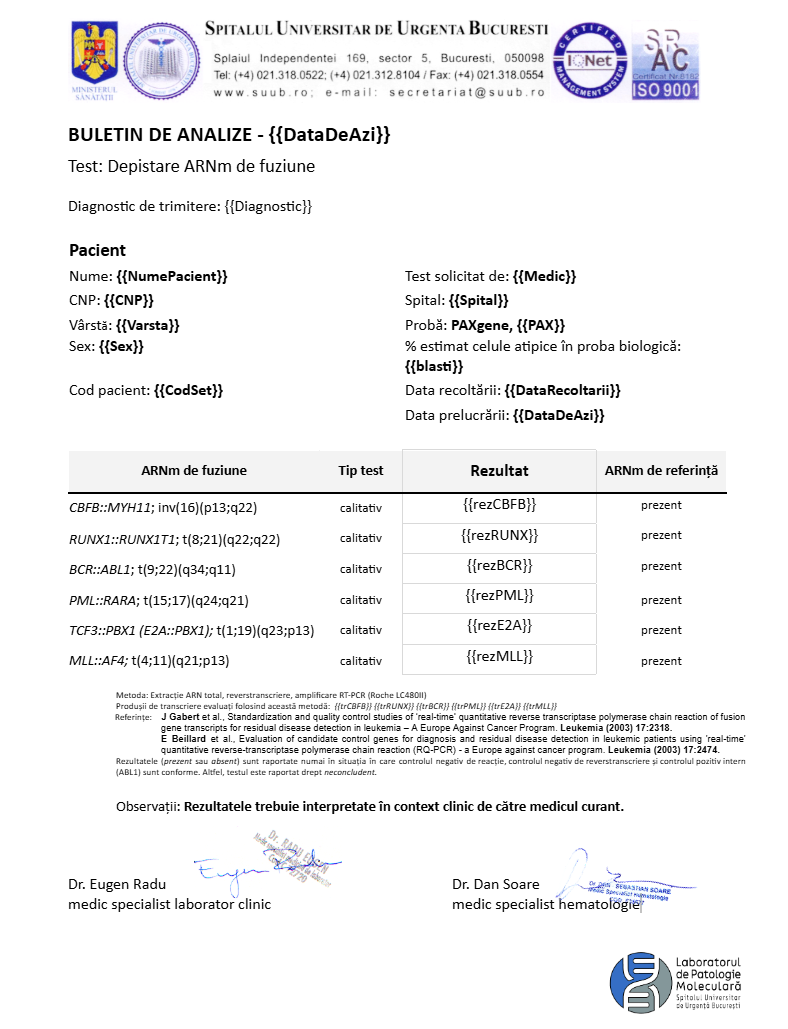 Test result Doc Template
⚙️ The Script Itself
Let’s take a closer look at the GeneFuziune() function as an example, since it showcases many of these features. First, the onOpen() function is what sets up our custom menu:
1
2
3
4
5
6
7
8
9
function onOpen() {
  const ui = SpreadsheetApp.getUi();
  const menu = ui.createMenu('Generare buletine de analiză'); // create the menu
  menu.addItem('1. Buletin Gene Fuziune','GeneFuziune');
  menu.addItem('2. Buletin FLT3-NPM1', 'FLT3NPM1');
  menu.addItem('3. Buletin cKIT','cKit');
  menu.addItem('4. Buletin BCR-ABL Cantitativ','Optolane');  // add dropdown stuff to the menu
  menu.addToUi(); }
Then we define some constants: the ID of our Google Doc template for this specific report and the ID of the Google Drive folder where the generated reports will be saved. We also get access to our main data sheet and grab all its data. Finally, we prepare the current date for stamping the report with.
1
2
3
4
5
6
7
8
9
10
11
12
13
function GeneFuziune() {
  const googleDocTemplate = DriveApp.getFileById('HereGoesTheTemplateID');
  const destinationFolder = DriveApp.getFolderById('HereGoesTheFolderID'); // id for the folder and template used
  const sheet = SpreadsheetApp.getActiveSpreadsheet().getSheetByName('Registru Hemato');
  const rows = sheet.getDataRange().getDisplayValues();

  var d = new Date();
  var curr_date = (d.getDate()).toString().padStart(2, '0');
  var curr_month = (d.getMonth() + 1).toString().padStart(2, '0');
  var curr_year = d.getFullYear();
  var DataDeAzi = curr_date + "/" + curr_month + "/" + curr_year; // gets current date, month was padstarted to keep a two digit format even when month is 01

  var ui = SpreadsheetApp.getUi();
Next, we start a while(true) loop. This allows the user to generate multiple reports one after another without having to re-run the script from the menu each time. Inside the loop, we first prompt the user for the sample ID.
1
2
3
4
5
6
7
8
9
10
11
  while(true) {
    let codsetPrompt = ui.prompt("Pentru ce Cod Set doriti buletinul de GeneFuziune?", ui.ButtonSet.OK_CANCEL);
    let button = codsetPrompt.getSelectedButton();

    if (button === ui.Button.CANCEL) break; // if cancel, exits loop

    let codset = codsetPrompt.getResponseText().trim().toLocaleUpperCase();

    if (!codset) {
      ui.alert("Nu a fost introdus un cod. Incercati din nou.");
      continue; } // restarts loop to ask for CodSet again
Once we have a sample ID (CodSet) we search for it in our sheet. If it’s not found, we alert the user and give them the option to try again or cancel. If found, we grab that specific row of data.
1
2
3
4
5
6
7
8
9
10
11
12
13
14
    let rowIndex = -1;
    for (let i = 1; i < rows.length; i++){ // skips header
      if(rows[i][0] === codset) {
        rowIndex = i;
        break;
      }
    }

    if(rowIndex === -1) {
      var negasit = ui.alert(`Codul ${codset} nu a fost găsit!\n\nApăsaţi OK pentru a reîncerca căutarea sau CANCEL pentru a renunţa.`, ui.ButtonSet.OK_CANCEL);
      if (negasit == ui.Button.CANCEL) break;
      else continue; }

    let row = rows[rowIndex]; // this gets the data for the specific patient/sample row
Now, we prompt the user to input the results for each of the fusion genes relevant to this report type. The user can leave a field blank if a particular test wasn’t performed for that sample.
1
2
3
4
5
6
    let rezCBFB = ui.prompt(`Status ARNm de fuziune CBFB::MYH11 al pacientului ${codset}:\n\n(PREZENT/Absent/Neconcludent)\n\nDacă nu a fost testat lăsaţi câmpul gol şi apăsaţi OK.`).getResponseText();
    let rezRUNX = ui.prompt(`Status ARNm de fuziune RUNX1::RUNX1T1 al pacientului ${codset}:\n\n(PREZENT/Absent/Neconcludent)\n\nDacă nu a fost testat lăsaţi câmpul gol şi apăsaţi OK.`).getResponseText();
    let rezBCR = ui.prompt(`Status ARNm de fuziune BCR::ABL1 al pacientului ${codset}:\n\n(PREZENT/Absent/Neconcludent)\n\nDacă nu a fost testat lăsaţi câmpul gol şi apăsaţi OK.`).getResponseText();
    let rezPML = ui.prompt(`Status ARNm de fuziune PML::RARA al pacientului ${codset}:\n\n(PREZENT/Absent/Neconcludent)\n\nDacă nu a fost testat lăsaţi câmpul gol şi apăsaţi OK.`).getResponseText();
    let rezE2A = ui.prompt(`Status ARNm de fuziune TCF3::PBX1 al pacientului ${codset}:\n\n(PREZENT/Absent/Neconcludent)\n\nDacă nu a fost testat lăsaţi câmpul gol şi apăsaţi OK.`).getResponseText();
    let rezMLL = ui.prompt(`Status ARNm de fuziune MLL::AF4 al pacientului ${codset}:\n\n(PREZENT/Absent/Neconcludent)\n\nDacă nu a fost testat lăsaţi câmpul gol şi apăsaţi OK.`).getResponseText();
With all the necessary information gathered (from the sheet and user prompts), we make a copy of our Google Doc template. Then, we open this new copy and get its body content to start filling it in. The replaceText method is the workhorse here, finding placeholders like in the template and replacing them with the actual data.
1
2
3
4
5
6
7
8
9
10
11
12
13
14
15
16
17
18
19
20
21
    const copy = googleDocTemplate.makeCopy(`Rezultat GeneFuziune ${codset} ${row[2]} ${DataDeAzi}`, destinationFolder);
    const doc = DocumentApp.openById(copy.getId());
    const body = doc.getBody();

    // now we replace placeholders in the template with the collected data both from user input as well as from Spreadsheet
    body.replaceText('', rezCBFB);
    body.replaceText('', rezRUNX);
    body.replaceText('', rezBCR);
    body.replaceText('', rezPML);
    body.replaceText('', rezE2A);
    body.replaceText('', rezMLL);
    body.replaceText('', DataDeAzi);
    body.replaceText('', row[0]);
    body.replaceText('', row[2]);
    body.replaceText('', row[3]);
    body.replaceText('', row[4]);
    body.replaceText('', row[5]);
    body.replaceText('', row[6]);
    body.replaceText('', row[7]);
    body.replaceText('', row[8]);
    body.replaceText('', row[12]);
The script also includes some neat custom data processing. For example, it converts a sample type code (like “MO” or “SP”) from the sheet into a more readable format. If it’s MO it means it’s a medullary aspirate sample, if it’s SP it’s peripheral blood. PAX is the tube type we use, PAXGene, for RNA extraction. 😋 It also parses an “observations” column to extract blast percentages if present for the correct sample type.
1
2
3
4
5
6
7
8
9
10
11
12
13
14
15
16
17
18
19
    let pax = row[10];
    let paxFIX = pax.includes("MO") ? "aspirat medular" : (pax.includes("SP") ? "sânge periferic" : "");
    body.replaceText('', paxFIX);

    // now to extract blasts percentage from an 'observations' column N
    const observatii = row[13];
    let blasti = "-";
    let bucati = observatii.split(/[,;]/); // this splits observations by comma or semicolon
    for (let x = 0; x < bucati.length; x++){
      let bucata = bucati[x].trim();
      if(bucata.includes("%")) { // If a part contains '%' it could mean it's blast percent
        // this checks if the blast % corresponds to the sample type (MO or SP) in observations column
        if(pax.includes("SP") && bucata.toUpperCase().includes("SP"))
          blasti = bucata.match(/\d+%/)[0]; // so it extracts the percentage :)
        if(pax.includes("MO") && bucata.toUpperCase().includes("MO"))
          blasti = bucata.match(/\d+%/)[0];
      }
    }
    body.replaceText('', blasti);
Based on the results the user provides for each fusion gene, the script can also insert specific pre-defined comments or transcript information into the report.
1
2
3
4
5
6
    if(rezCBFB) body.replaceText('', "CBFB-MYH11: tip A, D"); else body.replaceText('', "");
    if(rezRUNX) body.replaceText('', "RUNX1-RUNX1T1: transcript FG"); else body.replaceText('', "");
    if(rezBCR) body.replaceText('', "BCR-ABL1: p190, p210"); else body.replaceText('', "");
    if(rezPML) body.replaceText('', "PML-RARA: bcr1, bcr3"); else body.replaceText('', "");
    if(rezE2A) body.replaceText('', "TCG3-PBX1: FG transcript"); else body.replaceText('', "");
    if(rezMLL) body.replaceText('', "MLL-AF4: e9-e4/e9-e5; e10-e4/e10-e5; e11-e4/e11-e."); else body.replaceText('', "");
One of the most powerful features is the dynamic table formatting. The script finds all tables in the Google Doc. Then, for each table, it iterates through the rows backwards, which is important when deleting rows, I personally found that out the hard way 😂.
If a row corresponds to a test that wasn’t performed (e.g., the result cell is empty or “netestat” or “-“), that the entire row is removed from the report. If a result is “PREZENT” the script bolds that result and highlights the entire row with a light grey background. This makes the final report much cleaner and easier to read.
1
2
3
4
5
6
7
8
9
10
11
12
13
14
15
16
17
18
19
20
21
    let search = null;
    let tables = [];
    while(search = body.findElement(DocumentApp.ElementType.TABLE, search)) {
      tables.push(search.getElement().asTable());
    }

   tables.forEach(function (table) {
      let rowN = table.getNumRows();
      for (let r = 0; r < rowN; r++) {
               var row =  table.getRow(r);
               let cellN = row.getNumCells();
               for (var s = 0; s < cellN; s++) { // this loops through each cell in the current row
                  let cell = row.getCell(s); // get the current cell
                  if(row.getCell(s).getText().toLowerCase().includes("prezent") || row.getCell(s).getText().toLowerCase().includes("prezenta")){
                      if(s === 1){
                        let text = cell.getChild(0).editAsText();
                        text.setBold(true);
                  }
                  for(let c = 0; c < cellN; c++)
                     row.getCell(c).setBackgroundColor("#E0E0E0");
               }}}})
Finally, after all the content is filled and formatted, the script saves and closes the new Google Doc. It then gets the URL of this new document and inserts a convenient hyperlink back into our main sheet, on that specific patient’s row. This makes finding the generated report super easy later on. The script then asks if we want to generate another report, continuing the loop if we say yes.
1
2
3
4
5
6
7
8
    doc.saveAndClose();
    const url = doc.getUrl();

    // adds a hyperlink to the generated report in the main Google Sheet in column X
    sheet.getRange(rowIndex + 1, 24).setFormula(`=HYPERLINK("${url}", "Buletin GF ${row[0]}")`);

    let buletingenerat = ui.alert(`Buletin generat pentru ${row[0]}.\nGenerati buletin GeneFuziune pentru alt Cod Set?`,ui.ButtonSet.OK_CANCEL);
    if (buletingenerat == ui.Button.CANCEL) break; }}
The other functions (FLT3NPM1(), cKit(), and Optolane()) follow a very similar pattern: they define their specific Google Doc template and destination folder, prompt for results relevant to those tests, and then populate the template. The cKit() function has a bit more logic to ask for VAF (Variant Allele Frequency) if a mutation is present. The table formatting logic (removing rows or highlighting) is also present in some of these other functions.
 The script prompting for results to fill the report with
Thoughts
This little Apps Script project has been a huge win for our workflow:
- Massive Time Saver: What used to take many minutes of careful copy-pasting per report now takes just a few seconds and answering prompts.
- Reduced Errors: Automating the data transfer significantly reduces the chance of human error.
- Standardised Reports: All reports generated this way follow the exact same template and formatting.
- Easy Access: The hyperlink back to the generated report directly in our LIMS sheet is incredibly convenient.
Building this was also a great reminder of how powerful even simple scripting can be to solve real-world lab problems. Google Apps Script, being JavaScript-based and tightly integrated with Sheets and Docs, is surprisingly versatile for this kind of task. The most challenging part was getting the table manipulation logic just right, but it was satisfying to see it work.
Future ideas? Maybe adding more error checking for user inputs, or even trying to pull some results directly from other instruments if an API or intermediate file was available. For now, though, this button is already a lab favorite. 🤣